
Lab Goal
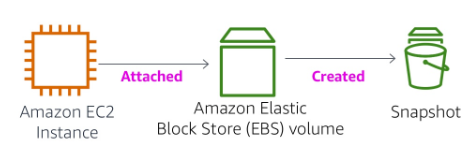
For this lab, we will dwelve into Amazon Elastic Block Storage (EBS). Our goal is to attach an Amazon EBS to an EC2 instance and creating a snapshot of it which will be stored in S3 bucket. In addition to that, we will also try to attach an Amazon EBS created from a snapshot to an existing EC2 instance.
Create a New EBS Volume
From Services, go to EC2. From the EC2 dashboard, click on Volumes from the left pane. There is a 8GB volume attached to the instance from the start.

To create a new volume, click on Create Volume. Configure the settings of the volume as below. Make sure the selected region is the same as the instance. Click Create Volume.

Attach the Volume to an Instance
Select My Volume which is the newly created volume. Open the Actions menu and select Attach Volume. Click on Instance field and select the instance that appears on the list. Click Attach.

Connect to EC2 Instance
We will now try to connect to the EC2 instance using SSH. I am using Windows and PuTTY. Before establishing the connection, I would need to download the private key of the lab for PuTTY to have access to AWS instances. From the instructions provided by the lab, I managed to receive the .ppk file of the lab.
Now start PuTTY and establish the connection to the instance. Below is my configuration for the connection. Make sure you attach the .ppk file under Connection > SSH > Auth in the private key box.


Proceed with the connection. Click Yes to trust the host and the login prompt should appear. After proceeding with the credentials, you should be connected to the instance through PuTTY.

Create and Configure Your File System
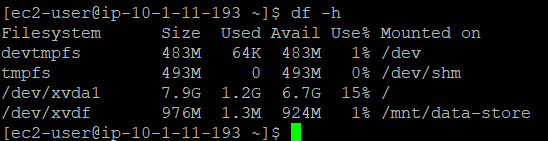
Let’s start with checking our current attached storage. You should be able to see the 8GB storage already attached.

Create an ext3 file on the new volume.

Continue with creating a directory to mount the new storage volume. Then, mount the new volume.Adding to that, configure the volume to be mounted every time the instance starts. Then, verify that the configuration is set on /etc/fstab.

Check the available storage again. You should be able to see your new volume attached to the instance now.
To test the new volume, create a simple text file on the volume and verify if it is accessible.

Create an Amazon EBS Snapshot
Now we will try to create a snapshot of the volume. From the AWS management console, click on Volumes and select My Volume.
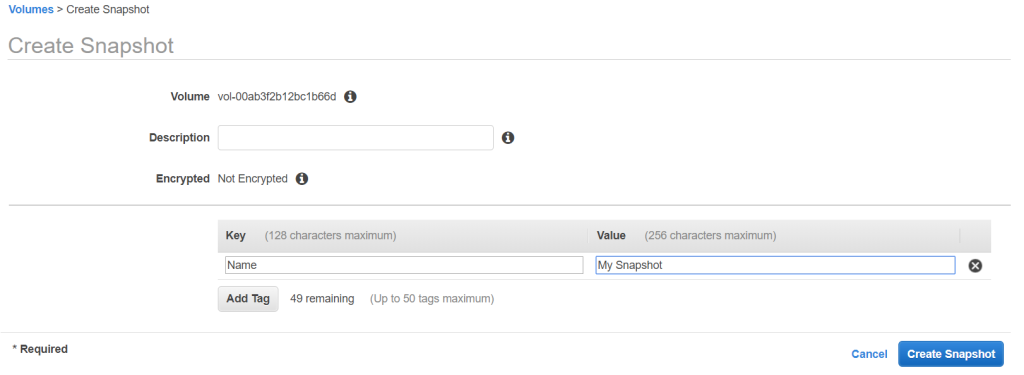
Click on Actions > Create Snapshot. Click Add Tag and configure it as below. Then, click on Create Snapshot.
Click on Snapshots from the left pane. You will see the snapshot should be created and might still be in a pending state. It will change to a completed state.

Now to test the snapshot, go back to PuTTY and delete the text file we just created. Verify that the file was deleted.

Restore the Amazon EBS Snapshot
From the Snapshot page, click on My Snapshot. Go to Actions > Create Volume. Select the appropriate availability zone and configure the tags as below. Then, click on Create Volume.

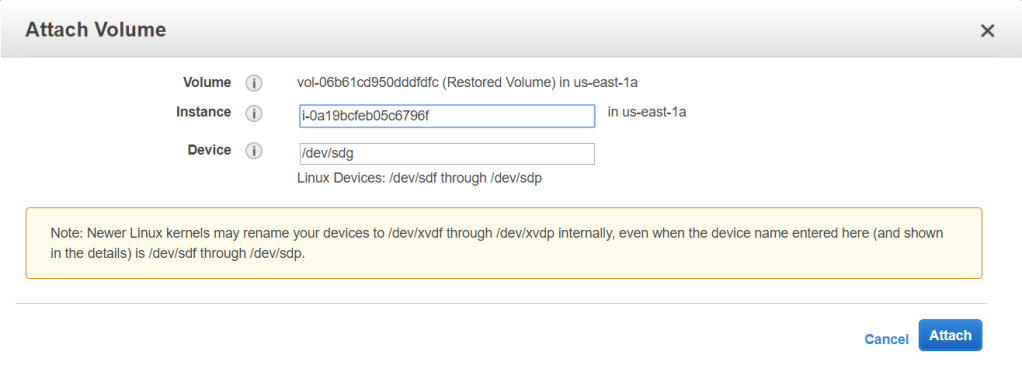
Go to Volumes from the left pane. Select Restored Volume and go to Actions > Attach Volume. Click the instance field and select your instance. Note that the volume path is /dev/sdg. Click Attach.
Now to mount the volume, go back to PuTTY. Create the directory for the new storage volume and mount it.
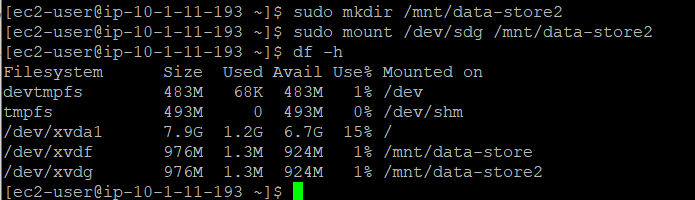
Now verify that the text file you created earlier is now available in the restored volume.

Critical Thinking
We have tested Amazon EBS capabilities in creating snapshots and recovering it to a volume. Amazon EBS volume is a block level storage which is separate from the instance and it is located on a network level. Amazon EBS provide high availability as well as performance.
There are several different type of volumes that you can choose, starting from a slower speed HDD to a high speed HDD. It is capable to provide larger range of workloads for the customer needs. Snapshots created from an EBS volume also provide a great sclability. Snapshots can be copied to other regions and initiate a volume for the instances on other geographical area.
There are several additional features of Amazon EBS which I would note, the data life cycle manager for snapshots and elastic volumes. Data life manager makes tasks of managing the life cycle of a snapshot easier. It is capable on cleaning up certain snapshots afeter exceeding certain time.
lastic volumes is also another key feature of Amazon EBS which provide the ability to scale up as it is running without any performance disruption. Integrating this feature with AWS Lambda and CloudWatch, you can easily scale you EBS Volume on-demand with ease.
