Create a Cluster Enabled for vSphere HA
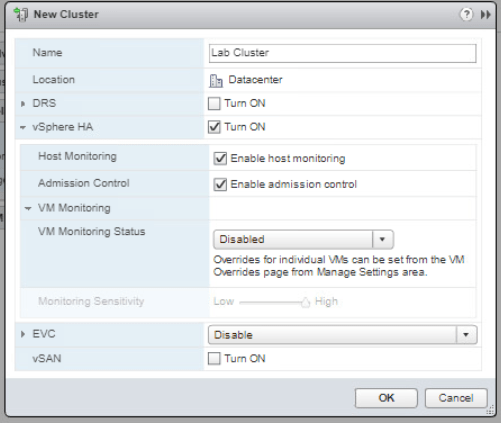
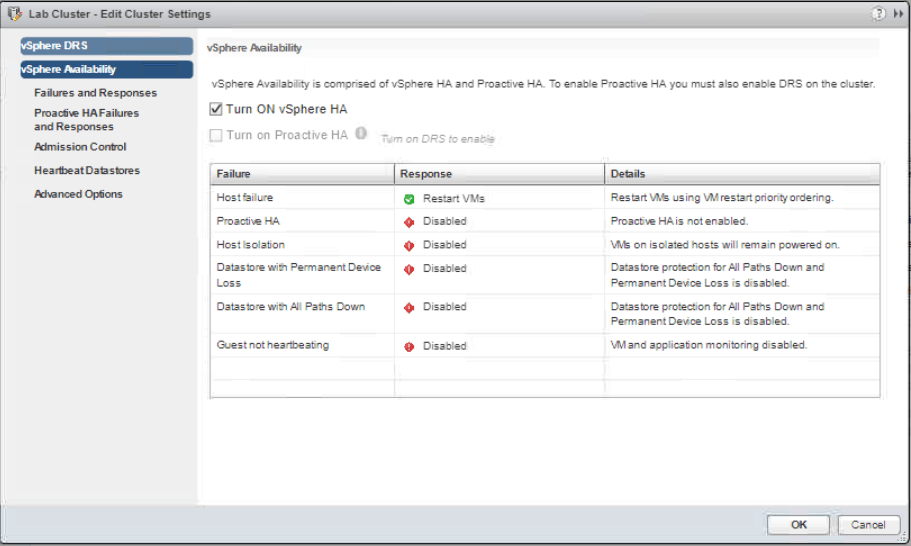
Start from you vSphere Web Client Hosts and Clusters tab. Right-click the Datacenter and select new Cluster. On the new cluster window, configure as shown on Figure 1. You have to turn on vSphere HA check box. Click OK.
Check the Recent Tasks pane to see it’s creation progress and after it is finished you can see that it appears in the navigator pane.
Add ESXi Host to the Cluster
Expand all of the objects in Hosts and Clusters tab and move both of your ESXi host to the Lab Cluster by dragging it. Click Yes on the warning. Be aware that all of the resource pools will be collapsed and all objects will be seen as one level. Also I will be dragging the second ESXi host first as it will be the master host, this is done like so because we are going to manually turn off an ESXi function and the first ESXi holds the VCSA which will cause our management system when it turns off.

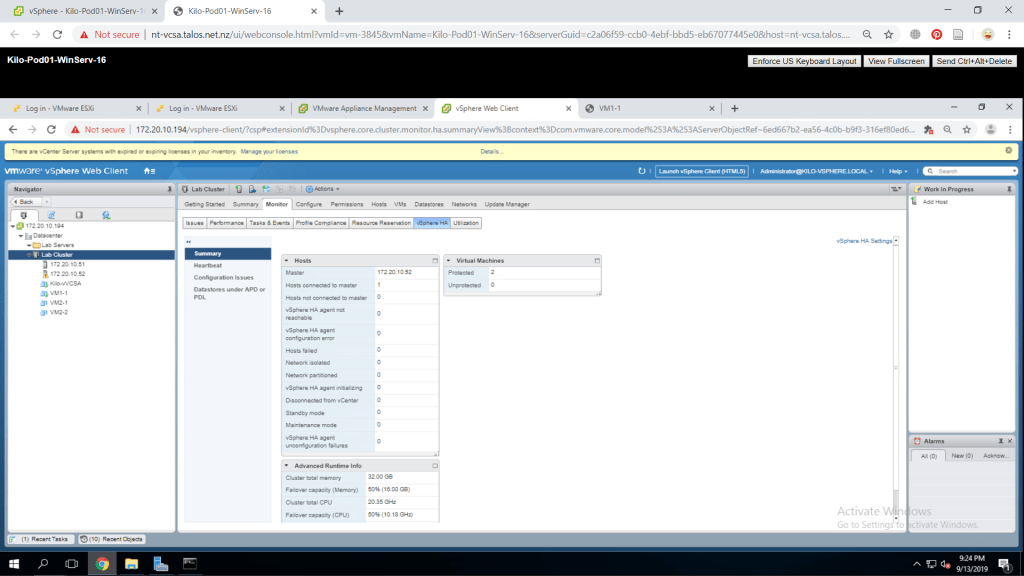
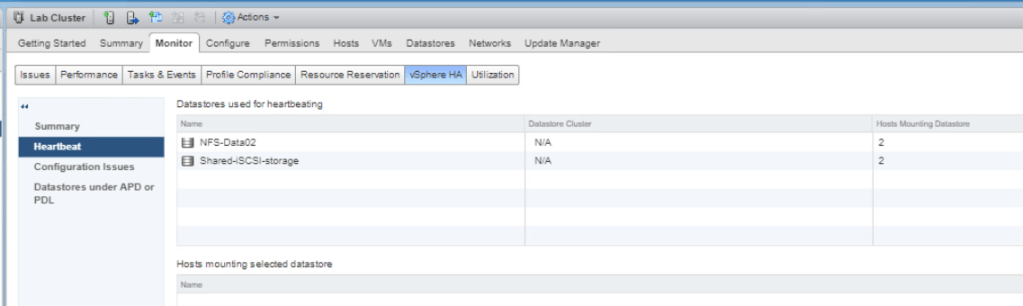
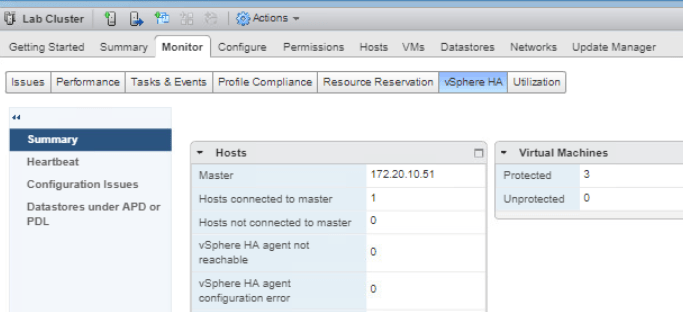
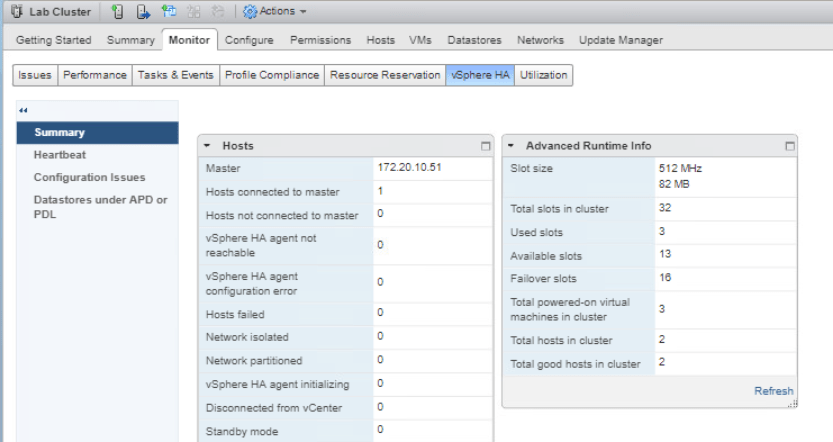
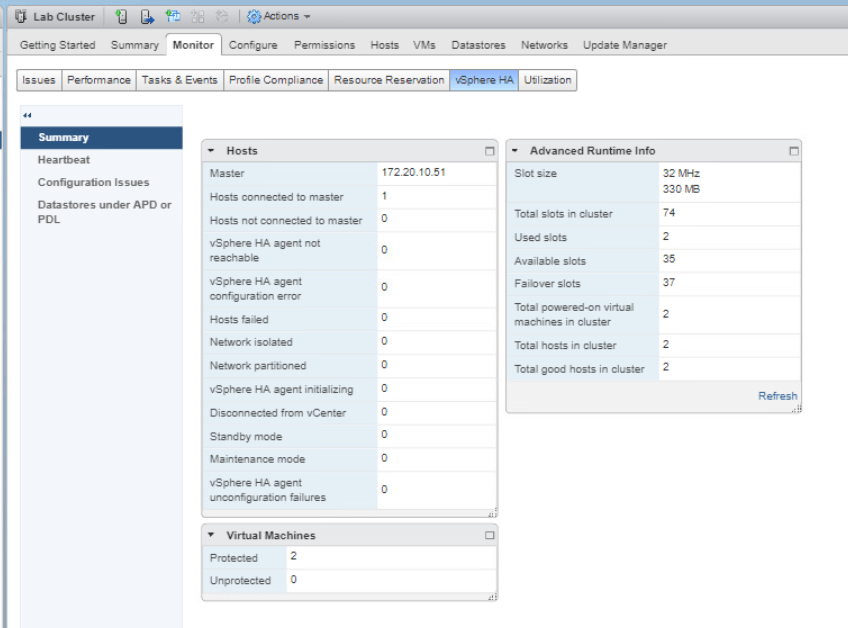
Select Lab Cluster and go to the Monitor tab in the middle pane. Click on vSphere HA tab then Summary to see information about the cluster.
Select Heartbeat and review the information displayed.
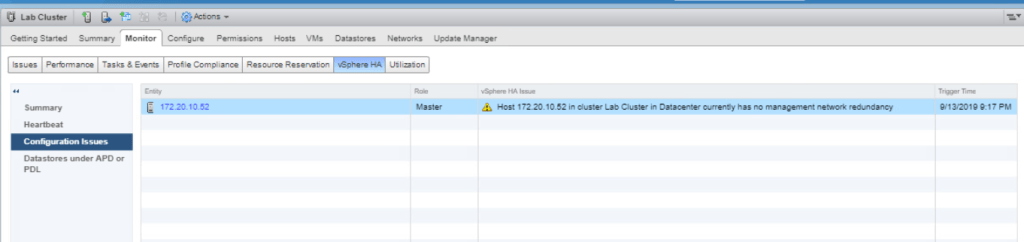
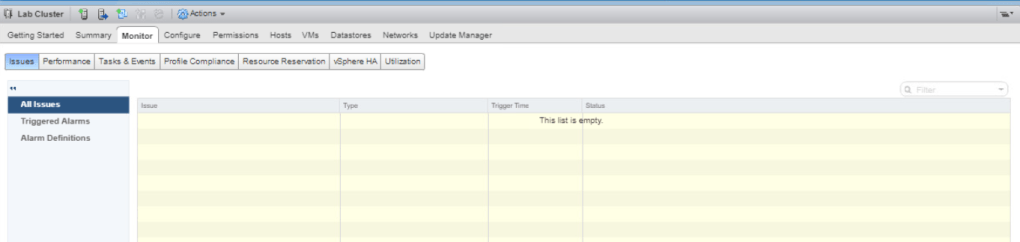
Select Configuration Issues and review any errors and warning displayed if there is any.
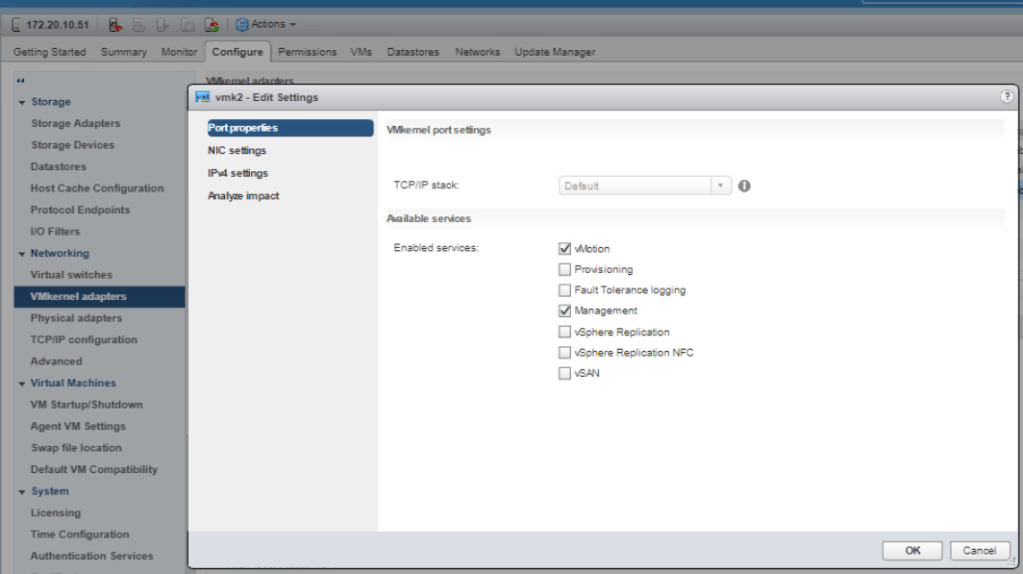
Now select your first ESXi host and go to the Configure tab. Select VMKernel adapters under Networking. Click on your vMotion VMKernel then click on Edit Settings icon. Make sure that on the Port properties page, vMotion and Management check box is checked. Click OK.
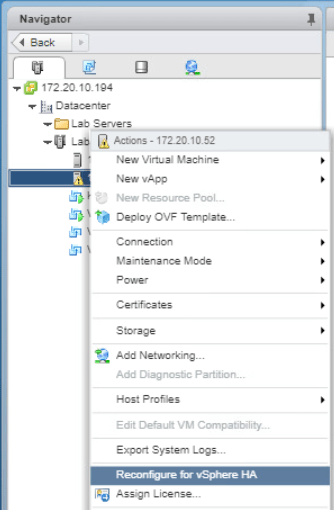
On the navigator pane, right click your first ESXi host and select Reconfigure for vSphere HA.
Repeat the above steps for the second ESXi host. After that, Go to the Monitor tab on Lab Cluster and click Issues then All Issues. Check if there are still any warnings or errors after the configurations. Ideally, it should be empty.
Test HA Functionality
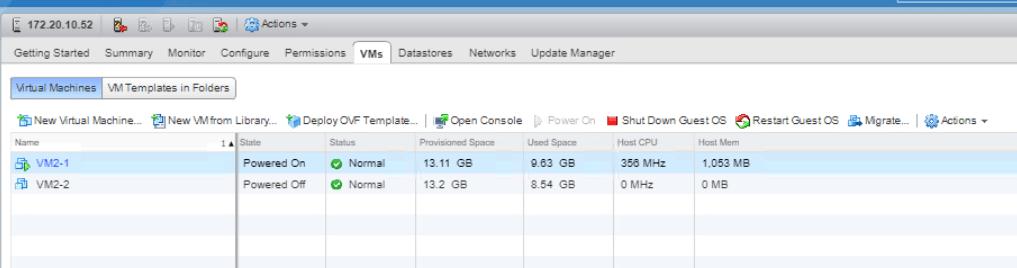
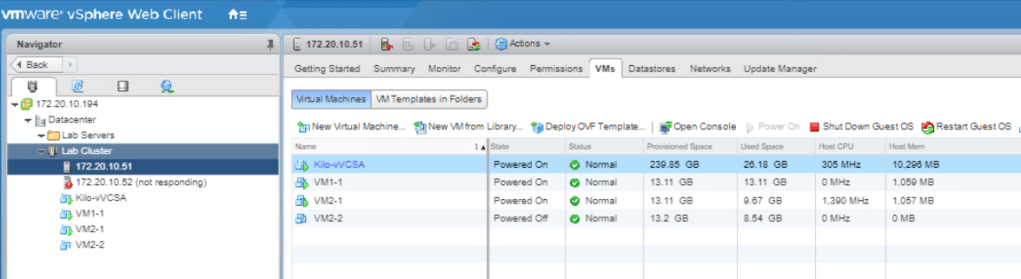
Just for the lab purpose, make sure you have one of your VM in the master ESXi host to be turned on. Click on your master ESXi host and go to VMs tab. If there is no VM on, turn at least one VM on.
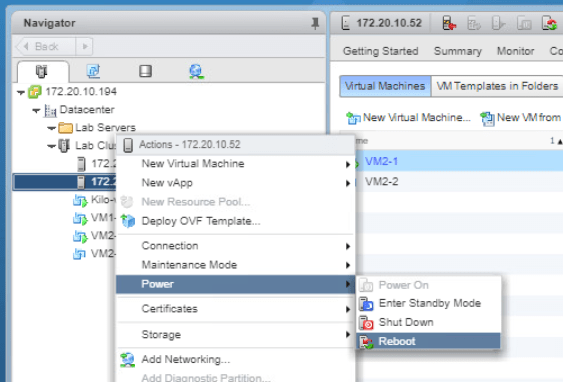
Now, we will try to reboot the master ESXi host to simulate the vSphere HA. Right-click the ESXi host and go to Power > Reboot. Click OK.
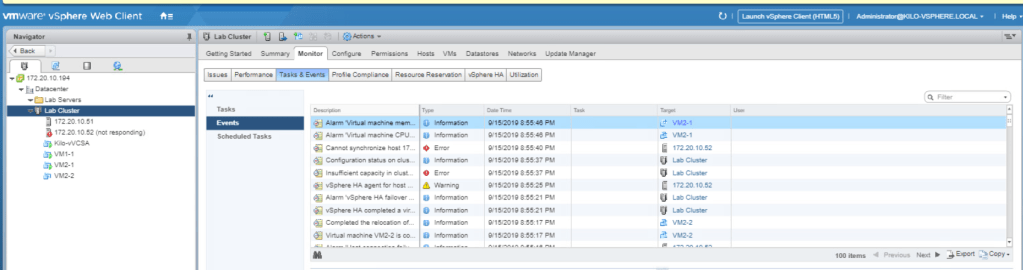
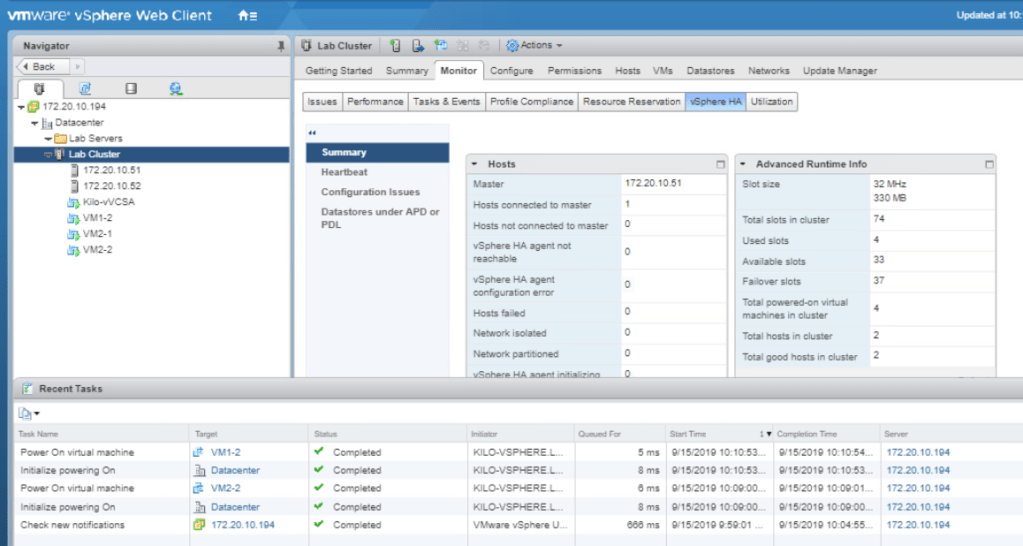
Click on your Lab Cluster and go to the Monitor tab. Select the Tasks & Events and choose Events from the middle pane. We could see what is happening to the hosts when one of them fails.
Click on the other ESXi host and go to the VMs tab. You could now see that the VM that is previously on the failing ESXi host has moved.
Now go to Lab Cluster Monitor tab. Choose the vSPhere HA tab and select Summary. See that the master has changed to the first ESXi host.
View vSphere HA Cluster Resource Usage
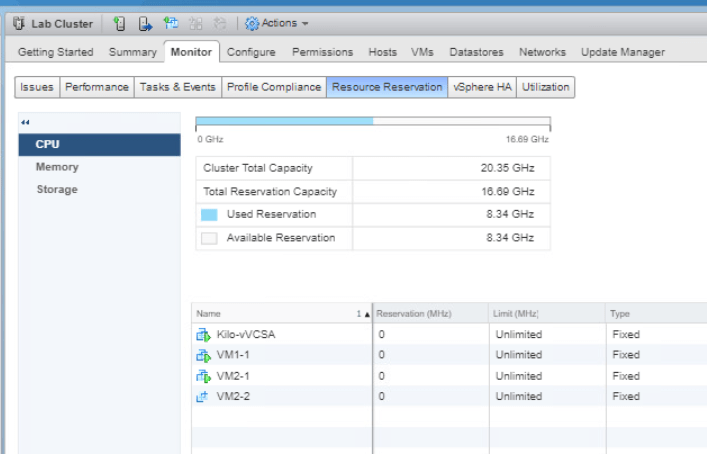
Go to the Hosts and Clusters tab and select Lab Cluster. Go to Monitor tab and choose Resource Reservation. Select CPU and it will display information about reservations CPU load. Verify that the reservation is not set on the VMs and it should be showing 0 (MHz).
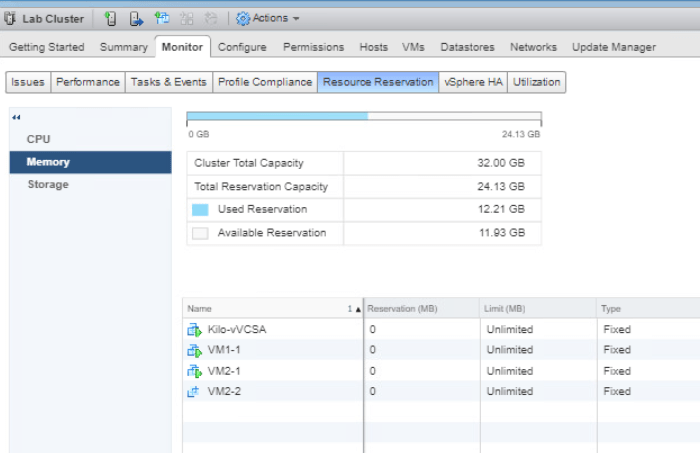
Now select Memory from the middle pane and it will display reservations memory load. Verify that the memory reservation is not set on the VMs and showing 0 (MB).
Manage vSphere HA Slot Size
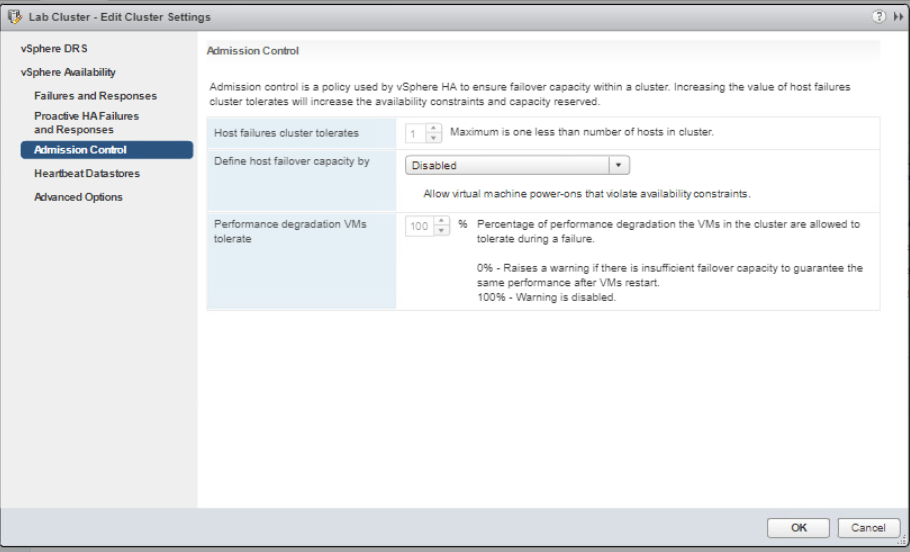
Go to Hosts and Clusters, right-click Lab Cluster and select Settings. In the middle pane, select vSphere Availability under Services and choose Edit.
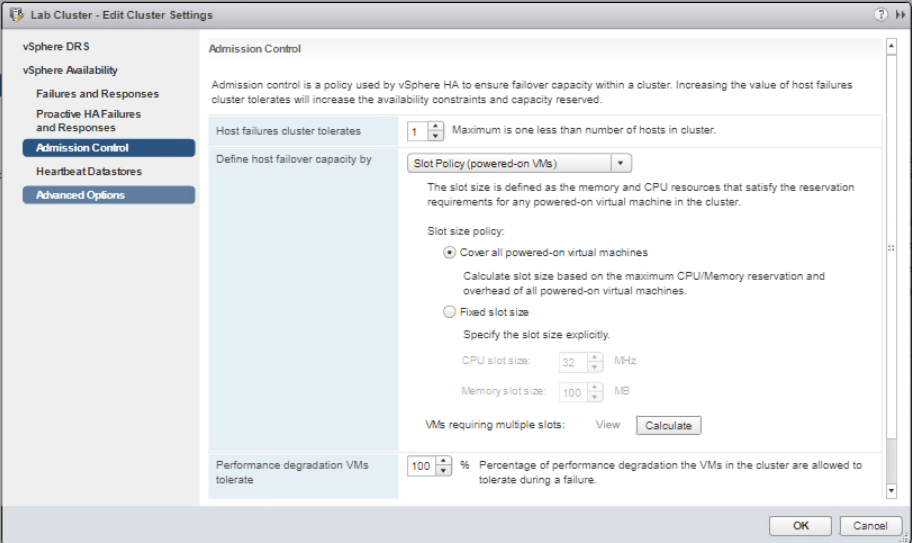
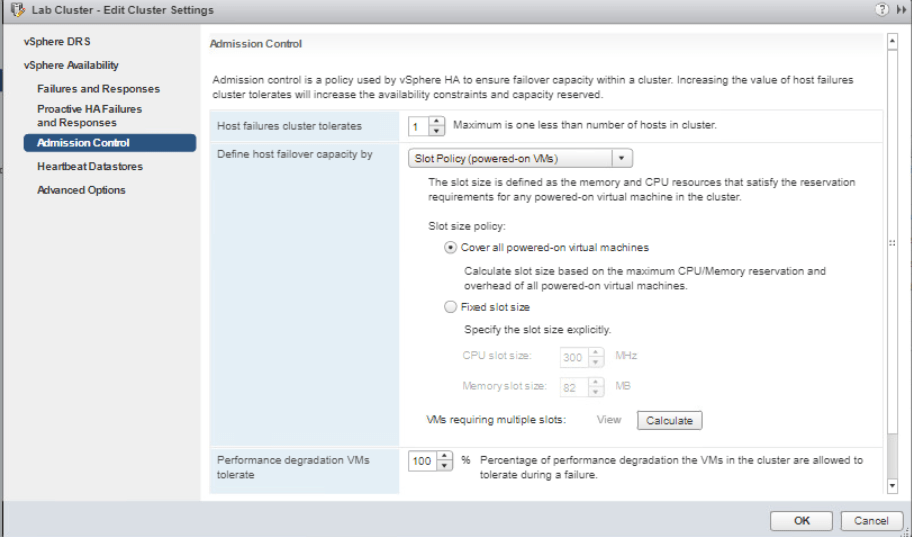
Now select Admission Control and choose Slot Policy (powered-on VMs) on Define host failover capacity by menu. Click OK.
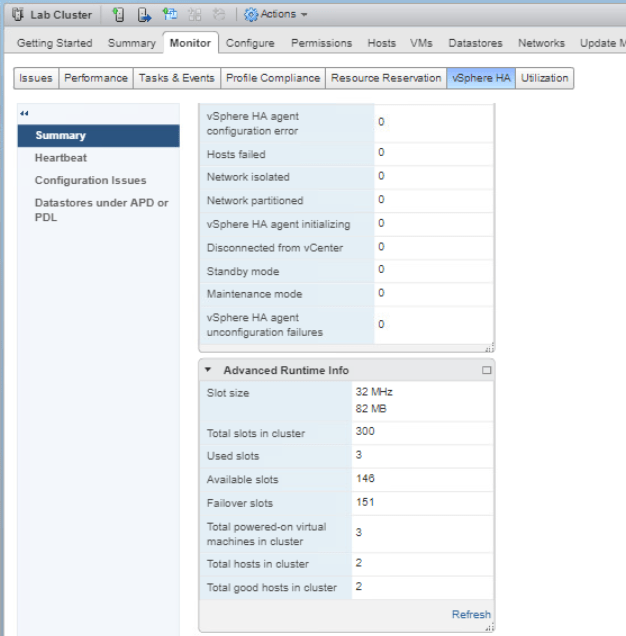
Now back to the Lab Cluster, enter the Monitor tab and click vSphere HA then go to Summary. Open the Advanced Runtime Info pane and the vSphere HA slot size could be seen here.
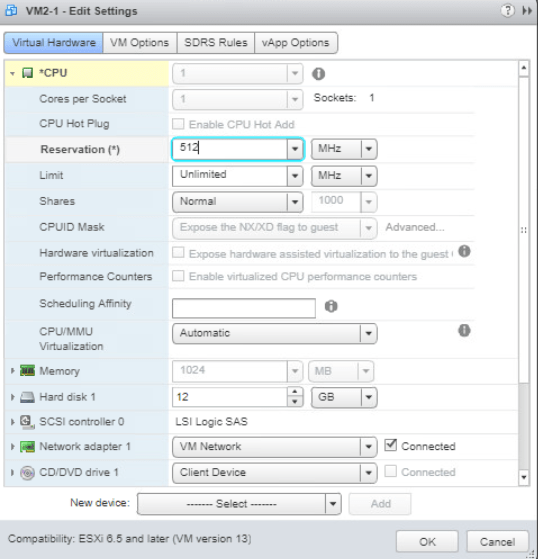
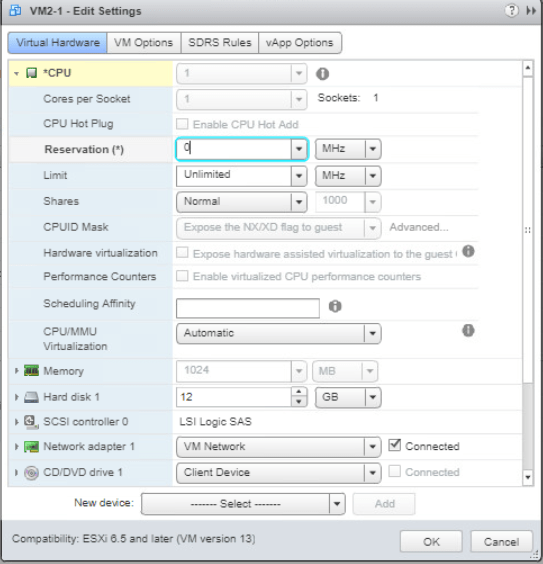
Next, select VMs and Templates tab and turn on one of the VM. Set the CPU Reservation of the VM by going to Edit Settings the expand CPU. Enter 512 (MHz) on the Reservation text box. Click OK.
Go back to Hosts and Clusters tab and select Lab Cluster. Enter Monitor tab and select vSphere HA tab. On the Summary, check the Advanced Runtime Info pane and you will see that the Slot size has changed.
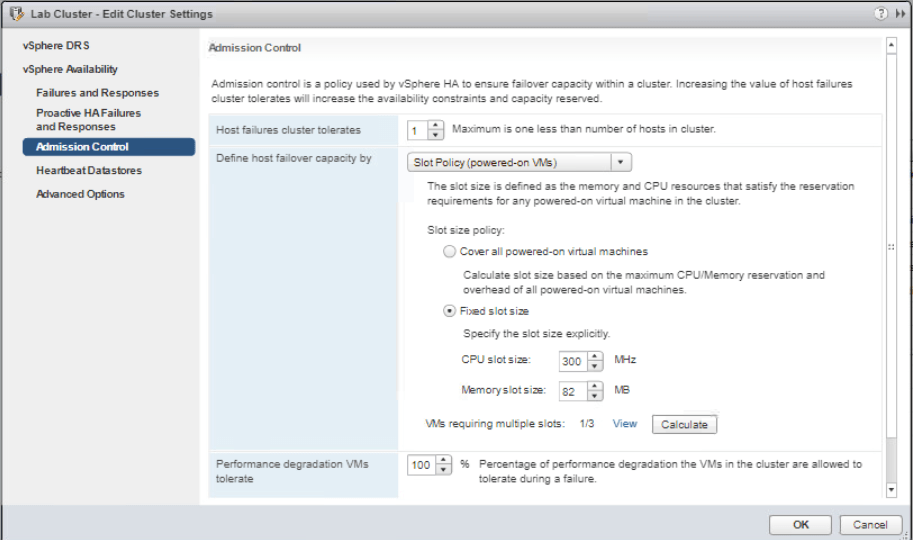
Next, we will enforce a slot size with vSphere HA slot size policy. Righ-click on Lab cluster and go to Settings. Go to vSphere Availability and click Edit then Admission Control from the left pane. On the Define host failover capacity by menu, choose Fixed slot size and enter 300 MHz in the CPU slot size. Click on Calculate button and then View beside it.
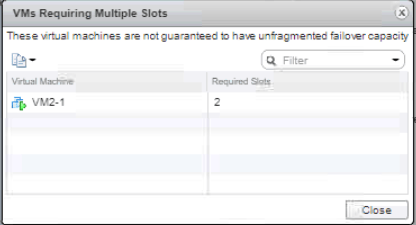
You will see that the required slot for the configured VM uses two slots. Click Close and OK.
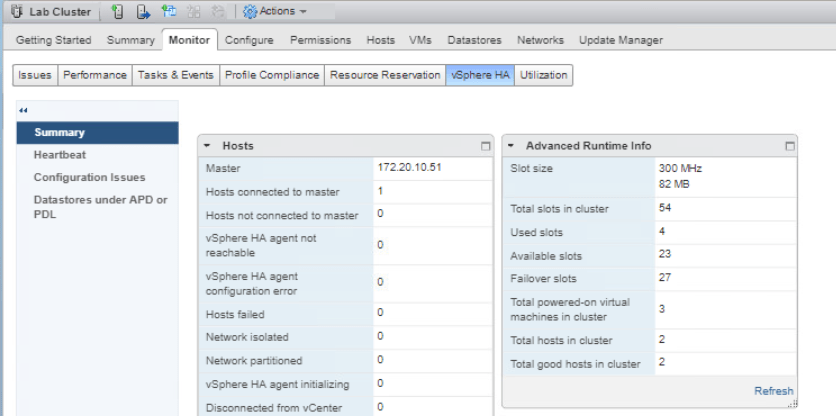
Now let’s check the vSphere HA slot size again. The same step as before, we go to Lab Cluster > Monitor tab > click vSphere HA > Summary. Under the Advanced Runtime Info, you could check that the Slot size has changed and various number of slots too.
As this is just for lab purpose, we will remove the slot size policy. Right-click on Lab cluster and go to Settings. Select vSphere Availability and click Edit. Go to Admission control and on Define host failover capacity slot size policy, choose Cover all powered-on virtual machines. Click OK.
Also remove the CPU reservation for the VM by going to Edit Settings on the VM. Expand CPU and enter 0 (MHz) on the Reservation text box. Click OK.
Configure vSphere HA Cluster with Strict Admission Control
In this part, we will try to configure a resource usage constraint for the cluster failover to use.
Go to Hosts and Clusters tab and shut down all of the VMs. Select Lab Cluster and go to the Summary tab. We will record the memory information as reference to the changes we will make later.

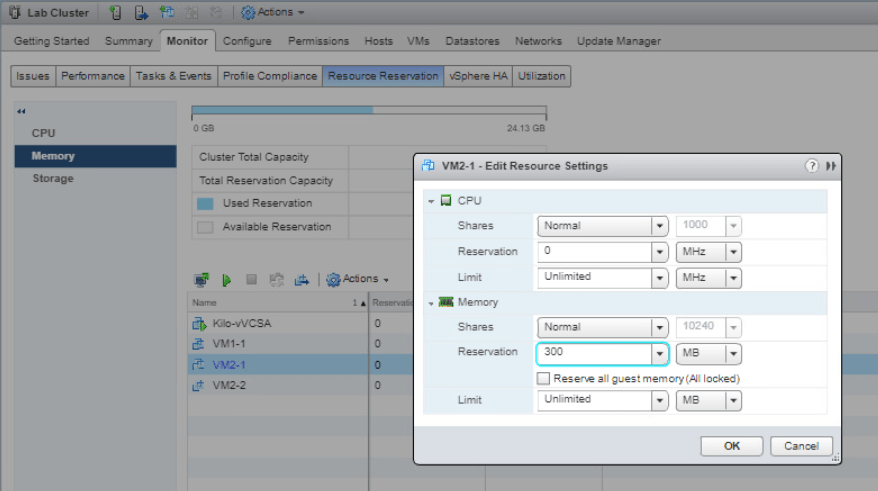
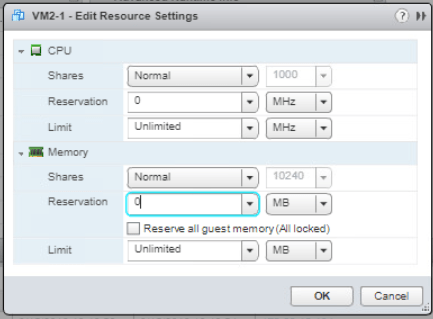
Now go to the Monitor tab and select Resource Reservation then Memory. Right-click on your VM2-1, select Edit Resource Settings. Expand Memory and fill 300 (MB) on Reservation text box and click OK. Repeat this action with another VM1-2.
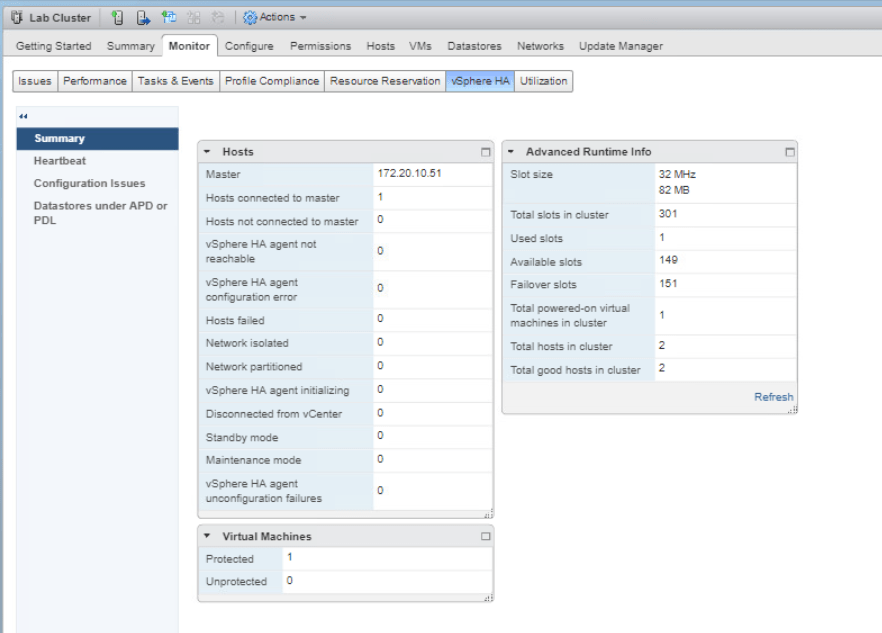
Now back to the Monitor tab of the Lab Cluster, select vSphere HA and click Summary. As you can see the Total slots in cluster is displayed as 301.
Turn on the VM2-1 and check the Advanced Runtime Info pane on Lab Cluster again. Click Refresh on the top. Now we could see that there are several slots that are available.
Power on VM2-2 and now check the Advanced Runtime Info pane again. Click Refresh to check the information about it’s available slots.

Next, power on VM1-2 and check on the Recent Tasks pane. We could see that every turned on VM uses 1 slot which means this cluster can hold 74 running VMs.
To prepare for the next lab, turn back the memory reservation in the VMs to 0 (MB).
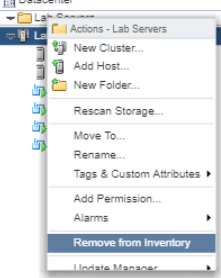
Remove Lab Servers from the Inventory as it is also not used anymore.
Lastly, disable the admission control that constraints the cluster failover capacity. Right-click Lab Cluster and select Settings. Select vSphere Availability and click Edit. Select Admission control on the left pane and on the Define host failover capacity by, choose Disabled then click OK.