
SSL Vulnerability in Lab 5
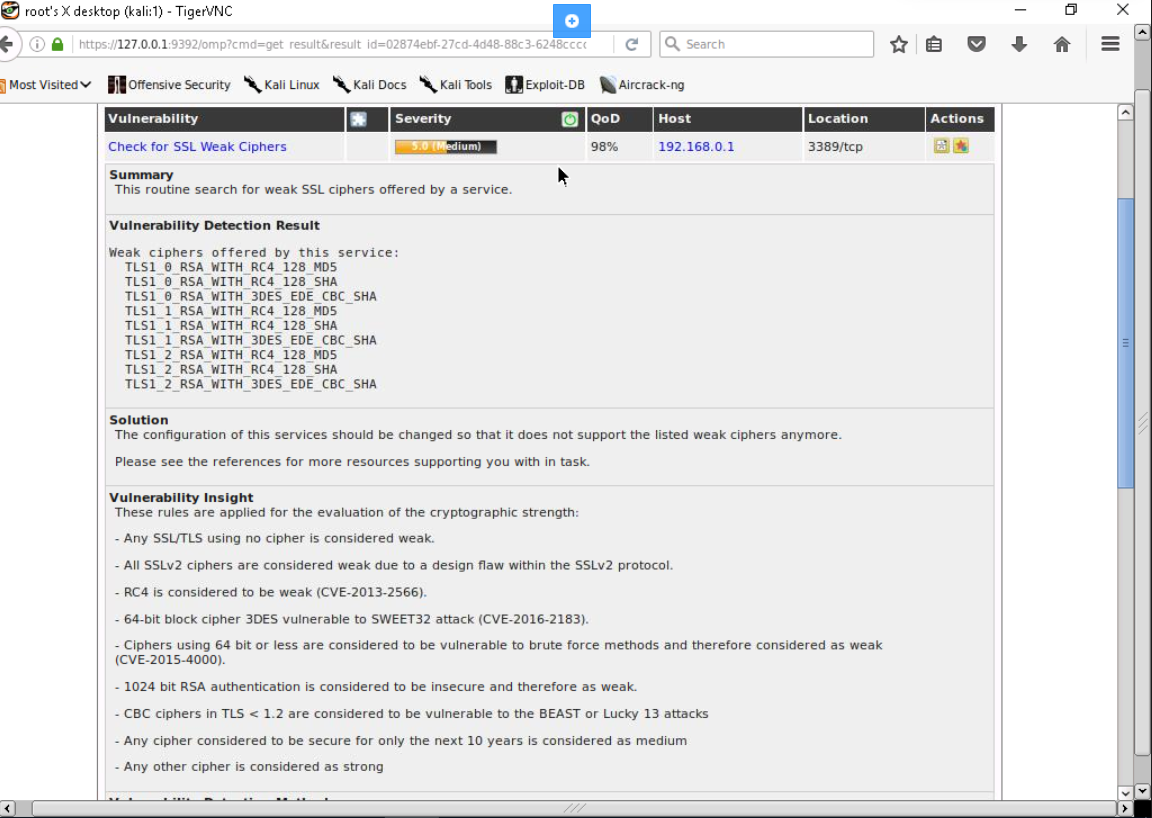
On a OpenVAS Scan executed in a Windows Server system, a severity level of 5.0 (medium) is shown. This LDAP scan shows several vulnerabilities and one of the is an SSL vulnerability which is a weak SSL cipher with 5.0 severity level. It is located on TCP port 3389.
Basically, this server only offers weak cipher for the host and client encryption key. In figure 1, we could see a list of weak ciphers that is offered by the server. All of them are TLS protocols with RSA algorithm which uses a public key for encryption and a private key for decryption. There are also only 2 hash algorithm used which is MD5 and SHA1. The difference there is only the TLS versions.
The problem is within the cipher algorithm which are the RC4 and 3DES. 3DES cipher only have 112 bits in terms of security strength for the minimum requires is 128 bits. RC4 cipher has been proved to contain various vulnerabilities to the point that several developers like Mozilla and Microsoft don’t recommend in using this cipher. The only way to minimize this vulnerability is to configure a more secure cipher in the services offered.
In the OpenVas Scan report, a vulnerability insight is provided to elaborate the weak points. We could see a CVE ID provided from the insight for the vulnerabilities. CVE-2013-2566 points to RC4 algorithm that is stated to have too many single-byte biases and can elevate the risk of a remote attack. This vulnerability has a CVSS score of 4.3. CVE-2016-2183 points to the 3DES algorithm which stated that it is vulnerable to a “Sweet32” attack. It has a CVSS score of 5.0. Next is the CVE-2015-4000 which covers a DHE_EXPORT on TLS version 1.2 and earlier. This cipher is suspectible to man-in-the-middle attack by down-grading cipher. It has the score of 4.3 for the CVSS.
Common Vulnerabilities and Exposures (CVE) database
Common Vulnerabilities and Exposures databes or CVE database is an open catalog of vulnerabilities in softwares and systems that is developed by MITRE which is an organizations of researchers and development centers funded by the federal government. It is mainly used to identify a weak point in the system so that organizations are more aware of its systems security.
Because CVE database is open and free for everyone, this means that all kinds of vulnerabilities will be exposed to hackers. However, it would still be advantageous for organization and companies to be aware of the vulnerabilities and exposures of their systems. CVE help provide the best security measure that would be appropriate for the vulnerability.
These CVEs have IDs with them which is assigned by CNAs (CVE Numbering Authorities). As the name describes, CNA will provide CVE ID to researchers and IT vendors for publication of the vulnerabilities. As we can see in the CVE website, There are several categories you can search by, such as by vendors, product, version and vulnerability. CNAs will help MITRE in discovering new vulnerability by providing identifiers also specifying the details of it.
Using vulnerability scanner to identify and remediate
In this lab, we specifically used OpenVAS scanner supported by GreenBone Security Assistant to provide a full interface of the scanner. We start by turning on OpenVAS through Kali Linux and access GreenBone Security Assistant from the browser. From there you will have to enter credentials and after that you will be able to use the OpenVAS scanner.
Next, we will check on types of scan and what services it covers. Under the Configuration tab, find Scan Configs which will show various type of scans. Select one that fits your requirements, different type will provide different depth and speed of sthe scan. If you click on of them, you will see a list of services that will be checked by the particular type of scan and the details of it.
To start the scan, we will go to Scan Management tab and open the purple wand icon. Choose Advanced Task Wizard and fill in the details and configurations of the scan. Click create task if you are done. You will be redirected to the Scan Management page with your task available and in progress. Wait until the scan task is completed.
You can check the progress of the scan in the scan coloumn. When the scan is done, the status will appear as Done and you will be able to see the severity level of the system. It is a indicator to help measure the amount of vulnerability available in the system. But bear in mind that this scan cannot be fully accepted as a complete final scan of the system. You will see that different scans will result a little differently as some services could not scanned.
You can click on the system name to check the details of the task. You will need to click on Reports result to check the scan reports of this system. Continue by clicking the date and time link on the next page to access the details of the scan. In this list you will see all detected vulnerabilities and the level of its severity. You can see more details by clicking one of them.
As displayed like figure 1, this is the details of a vulnerability which provide information about its summary, detection result, given solution and insights. All of this information can be used to help you remediate the issue as given by the solution.
After you have tried to patch the vulnerability, you can try scanning again with the same steps as shown before. Try to access the latest report and see whether the vulnerability is still shown. You might see difference in the results, as stated before, some attributes might or might not be able to be scanned at the time of the scan. However, we are trying to remediate a vulnerability you have just patched. Try to find if it is still available in the newest scan and if it is not available than you have successfully remediate the vulnerability.
